Welcome back to the Chicks Gold blog series; we’re back once again to bring you everything you need for a successful in-game endeavor. This week, we’ll be working through the steps to victory in the Firelands WoW raid. We’ll take a look at the layout, loot, strategies, achievements and more to give you a crystal clear vision of success. This is the main raid of the third phase of Cataclysm, giving players an intense adventure where the stakes are high and teamwork is essential. Between 10 to 25 players can group together to take on this challenging battle, so gear up, get your ducks in a row, and get ready for war! Let’s get started with how to reach this heart-racing battle:
WoW - How to Get to The Firelands Raid?
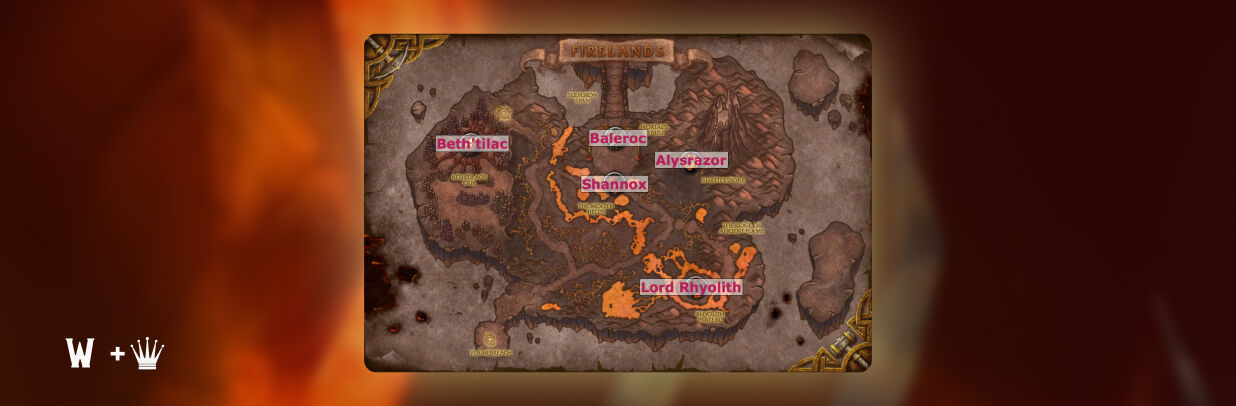
Within your map, you will see Mount Hyjal, and within this area, the Firelands can be found in a zone to the south and surrounded by lava. This is where you can find the vendor for the raid and a summoning stone you can use to summon the rest of your group before entering the WoW Firelands Road entrance. The next thing to get to grips with is the layout of the Firelands raid in WoW. So let's take a look:
Firelands Raid WoW Layout
When you enter, you’ll see that the first section contains five of the seven enemies that you will be facing. Here are the bosses you’ll be facing here:
- Shannox
- Lord Rhyolith
- Beth’tilac
- Alysrazor
- Baleroc The Gatekeeper
You can take on the first four in any particular order before battling Baleroc to unlock the next area of the Firelands WoW raid. Once you have done so, enter the second area, where you will encounter Majordomo Staghelm in battle. Lastly, you must face Ragnaros.
The next thing we’ll be exploring in this WoW Firelands raid guide is the Boss strategies to ensure you’re well prepared for the fight ahead. So, let’s get started!
Firelands Raid WoW - Strategies
Each of the seven bosses has their own unique mechanic, which you must master in order to take the win. So, wrapping your head around these before you run into the battlefield will drastically improve your success rates; let’s check out a little bit about each of the enemies you’ll be taking on.

Shannox - Battle Strategies
This boss will patrol the entire front area of the Firelands, giving you more options as to when and where you want this battle to take place. So you’ll want to make sure you have cleared the area you want to use as a battleground, as you’ll be making a lot of movements throughout the fight.
Role-Specific Tips
- DPS - remain alert of new traps and be prepared to move at a moment’s notice, especially when considering melee DPS. You must also move away from any “Hurl Spear” or “Magna Rupture” locations, as they can easily kill you.
- Healer - tanks require frequent movement during this Firelands Raid WoW encounter, so ensure you’re always within range of your target to keep them on their feet. You’d also want to coordinate defensive cooldowns for every “Magma Rupture” towards the end of the battle.
- Tank - your main priority in this encounter is to manage your “Jagged Tear” debuffs, and don’t be afraid to kite if necessary. You and the other tank must also remain aware of each other's positions to keep as much distance between the foes' attacks and weapons. Lastly, you’ll want to try to keep any major defensive cooldowns for the burst phase at the end of the battle.
Shannox Abilities
The last thing we’ll be looking at regarding this WoW Firelands raid boss is his movesets. So, check them out!
- Immolation Trap
- Crystal Prison Trap
- Arcing Slash
- Jagged Tear
- Hurl Spear
- Separation Anxiety
- Frenzy
- Magma Rupture
Riplimb
- Limb Rip
- Wary
- Frenzied Devotion
Rageface
- Face Rage
- Wary
- Separation Anxiety

Lord Rhyolith - Battle Strategies
For this second encounter, you and your team must control his movements by attacking his left or right leg. Whichever you choose to direct your attacks at will see him turning in that direction. Because of this, you and your fellow players must strategize the best ways to attack in order to coordinate movements and balance out the fight. You can dismiss this strategy and go straight to dealing damage directly to his torso, but this may see you and your team holding less control over the match.
This Firelands raid in WoW battle will see Lord Rhyolith using a built-in soft-enrage mechanic in “Superheated” after 6 minutes of combat (in heroic, it’s only 5 minutes). This mechanic will see Lord Rhyolith gain a stack of Superheated every ten seconds, and he will wipe out the raid if you fail to stop him shortly after the buff is gained.
Role-Specific Tips
- DPS - melee DPS need to learn to coordinate and follow a single-direction caller to pilot the boss. Focusing adds down quickly while acting as a ranged DPS should be a top priority, and you will always be able to attack the boss's torso if you wish to avoid directional changes.
- Healer - keep an eye on players with high stacks of “Eruption,” as AoE damage can easily kill them. In this position, you should also rotate raid-wide defensive cooldowns when Lord Rhyolith has high stacks of Superheated in phase two.
- Tank - when your team has enough ranged DPS to kill adds quickly, you can solo tank the battle with ease and earn an extra DPS. Grab adds quickly as they spawn and stack or move them out of the raid to kill them as soon as possible. You must also be ready with your taunt as soon as the boss hits 25% health, as this is when he activates and starts the attacks on you and your team.
Lord Rhyolith Abilities - Phase One
- Obsidian Armor
- Molten Armor
- Concussive Stomp
- Drink Magma
Volcano
- Eruption
Crater
- Magma Flow
- Summon Fragment of Rhyolith
- Fragment of Rhyolith
Spark of Rhyolith
- Immolation
- Infernal Rage
Lord Rhyolith Abilities - Phase Two
- Immolation
- Unleashed Flame
- Superheated

Beth’tilac - Battle Strategies
When you and your team take on this creature, you’ll need to split into two groups: a ground-level group and a web group. In the ground group, you’ll need your AoE DPS, and you’ll be focusing on killing spider adds as the fight progresses. Your web-group will consist of one tank, at least one healer, and as much DPS as can be spared from the ground group.
Those on the ground must aim to kill the spider adds before the next spawn, and any DPS which can be spared should go to the web-group to throw as much damage as possible at Beth’tilac before the second phase begins. This Firelands raid WoW boss has the unique resource of Fire Energy, and she will start the battle with full Fire Energy, which will slowly be drained over time. This energy can be siphoned from her ”Cinderweb Drone” broods, which come to her assistance throughout the fight. Once her Fire Energy is entirely depleted, she will unleash “Smoldering Devastation,” which will end any players at the top of the web. After casting this three times, she will descend from the web and begin phase two.
Role-Specific Tips
- DPS - killing “Cinderweb Spiderlings” is essential and must be done efficiently. Don’t waste too much damage on over-killing adds. Take some time to ensure “Cinderweb Drones” do not deplete any Fire Energy, as you will be able to inflict far less damage before phase two.
- Healer - since tons of AoE damage is a factor in this Firelands raid WoW encounter, it’s important to coordinate healing assignments to keep the raid going as long as possible. When in heroic difficulty, you must also take time to assist plates targeted by Drones.
- Tank - grab Cinderweb Drones quickly, face them away from the raid, and kite them from any approaching Spiderlings if they get too close. In the second phase, tanks must swap for “Widow’s Kiss.”
Beth’tilac Abilities - Phase One
- Ember Flame
- Meteor Burn
- Venom Rain
- Consume
- Smoldering
- Devastation
Cinderweb Spinner
- Burning Acid
Cinderweb Drone
- Consume
- Boiling Splatter
- Burning Acid
- Fixate
Cinderweb Spiderling
Seeping Venom
Beth’tilac Abilities - Phase Two
- Frenzy
- The Widow’s Kiss
- Ember Flare
- Consume
Now that we’ve covered our third boss in the Firelands raid in WoW, let’s move on to the forth!

Alysrazor - Battle Strategies
For this boss encounter in the Firelands WoW raid, you’ll notice that it has four phases, with you and your team taking on numerous adds, deadly flames and literal gravity itself. Despite these four phases, most of your team's focus will center around the first phase, which lasts three minutes (four minutes and ten seconds in heroic). When enraged, the boss will blast the area with “Firestorm,” which will cover the WoW Firelands raid entrance and exits with Volcanic Fire before taking flight over the battlefield. Alysrazor will then do a strafe-run over the field once a minute, attending those in range with Blazing Claw.
This is where you’ll see her dropping Molten Feathers, which you can collect to gain a buff (up to three feathers can be collected).
Role-Specific Tips
- DPS - kill adds as efficiently as possible and do not waste damage on padding or overkill. You must also keep your Blazing Power stacks if you want to kill this boss quickly.
- Healer - keep your tank in your sights during phase one; they’ll need to move a lot during this first phase and may need your assistance at a moment's notice; they’re subject to massive damage in the fourth phase, too, so be ready with defensive cooldowns.
- Tank - keep your healers in your sights, working with them to ensure you can get the help you need when you need it. Make sure you keep the “Voracious Hatchlings” constantly facing away from the raid to prevent the “Gushing Wound” from affecting other teammates. Lastly, ensure you rotate defensive cooldowns in phase four to survive “Blazing Claw.”
Alysrazor Abilities - On Pull
- Fire Storm
- Volcanic Fire
Alysrazor Abilities - Phase One
- Blazing Claw
Blasting Talon Initiate
- Brushfire
- Fieroblast
- Fire It Up!
Voracious Hatchling
- Gushing Wound
- Imprinted
- Hungry
- Satiated
- Tantrum
Plump Lava Worm
- Lava Spew
Alysrazor Abilities - Flying Player
Molten Feather
- Molten Feather
- Wings of Flame
- Incendiary Cloud
- Blazing Power
- Alysra’s Razor
Alysrazor Abilities - Phase Two
- Harsh Winds
- Fiery Tornado
- Fiery Vortex
Alysrazor Abilities - Phase Three
- Burnout
- Essence of the Green
- Spark
Blazing Talon Clawshaper
Ignition
Alysrazor Abilities - Phase Four
- Ignited
- Blazing Buffet
- Blazing Claw
- Full Power

Baleroc - Battle Strategies
This is the fourth boss encounter in the Firelands Raid WoW, and it must be defeated after you have battled the first four in any particular order. It is the downfall of this boss which will open the gates to the deeper sections of the Firelands for you and your team to take home the win. Fortunately, this battle is fairly straightforward and acts more as a gear check with only a few mechanical responsibilities. Your main concern will be the mechanic the DPS will be dealing with, namely the “Shards of Torment,” which appear throughout the room. For every shard, at least one player must have their focus on it, as if one spawns, and if left alive unattended, it will cast “Wave of Torment” and wipe the raid.
Role-Specific Tips
- DPS - keep a close eye on “Shards of Torment” and position them within melee range, surrounding them where possible. When playing the WoW Firelands raid in heroic difficulty, be more mindful of the “Tormented” debuff to prevent it from spreading.
- Healer - find harmony with your two healer squads; have one focus on stacking “Vital Spark” and the other on keeping the tanks standing. The stacks of Vital Spark will last for 60 seconds and will reset after activating “Vital Flame” to allow you to keep stacks. Lastly, as a healer, ensure you don’t get carried away with stacks and communicate when you need to swap duties with other bailable healers to keep the tanks standing.
- Tank - use avoidance gear to dodge, parry and miss attacks made during “Inferno Blaze” and “Decimation Blade.” You must also always keep your eye on the Shards of Torment positioning in melee range to ensure you aren’t slain by the Tormented debuff.
Baleroc Abilities
- Decimation Blade
- Decimating Strike
- Inferno Blade
- Inferno Strike
- Blaze of Glory
- Incendiary Soul
- Shards of Torment
- Wave of Torment
- Torment
- Tormented
- Vital Spark
- Vital Flame
- Countdown

Majordomo Staghelm - Battle Strategies
For the sixth Firelands raid in WoW and the final step between your team and Ragnaros, you’ll need to manage multiple buffs, as well as his two shapeshifting forms. “Cat form” and “Scorpion form” will activate differently depending on your team's positioning during the raid. For every time he shifts form, he will gain a stack of “Fury,” which will increase all damage dealt by 8% per stack, acting like a soft-enrage, preventing the raid from skipping an undesirable form. Either form being in use will cause Majordomo Staghelm to gain energy up to 100, which, once reached, will use a unique ability (varies depending on form). With each special ability, a stack of “Adrenaline” will increase energy regeneration by 20% per stack.
Role-Specific Tips
- DPS - make killing the “Spirit of the Flames” as fast as possible a priority in this section of the Firelands raid in WoW to keep the Cat form in action for as long as you can. The flames from “Leaping Flames” can kill in seconds, so be ready with movement abilities at the ready for a quick exit. When in heroic difficulty, maintain maximum “Concentration” stacks wherever possible to ensure you meet the DPS requirements.
- Healer - be prepared to carry out a mana-intensive and quick-healer-reaction-based battle, being mindful of players with high stacks of “Burning Orb” debuffs; this mechanic deals damage for 8 seconds after soaking new stacks has been stopped.
- Similarly to DPS, in heroic difficulty, you must maintain maximum “Concentration” stacks to meet healing requirements.
- Tank - save defensive cooldowns so that when healers are struggling, you can keep the raid alive. You’ll also want to consider minor defensive cooldowns and damage-reducing debuffs to take on multiple Spirit of the Flames to keep Cat form in play.
Majordomo Staghelm Abilities
- Concentration
- Fury
- Adrenaline
- Cat Form
Leaping Flames
- Spirit of the Flame
- Scorpion Form
- Flame Scythe
Night Elf Form
- Fiery Cyclone
- Searing Seeds
- Burning Orbs

Ragnaros - Battle Strategies
It’s time to check out the final boss in this Firelands raid in WoW guide. So, gear up as we prepare to go head to head with the Fire Lord once more. The battle ahead is not an easy one, and each and every member of your team must be ready to lock in, listen up, and fight to the death. Ragnaros will be in the center of a lava pool, which can cause you some hefty damage if you stand in it. The battle consists of three phases, each having a short intermission between them, and in heroic difficulty, you’ll find a fourth phase. Since the battle is quite intensive, we’d recommend taking a few trial runs or learning the phases intently before proceeding; if you do take on the challenge blindly, do quick pulls back-to-back in phase one and intermission one to find your feet. To get this part of the Firelands raid WoW journey started, you’ll want to spread your team out into 4 group positions, with your ranged and healers at least 6 yards apart.
Role-Specific Tips
- DPS - the final battle is almost entirely movement-based, so you’ll want to prioritize proper positioning and placement before anything else. Search for the fiery light beams to gauge where the “Son of Flames” will spawn, allowing you to react to those closest to the hammer as quickly as possible. Lastly, don’t be afraid to use your personal defensive cooldown in difficult times of the battle to give your healers a short break.
- Healer - buckle up for an extremely long mana, intensive, and heavy healing battle. Remain alert to top up low-health players before “Hand of Ragnaros,” “Wrath of Ragnaros,” or “Magma Trap Eruption” is dealt. You must also be extra attentive to potentiometers' “Dreadflame” fire patches and be ready to administer raid-wide defensive cooldowns.
- Tank - tank swap for every 3-5 stacks of “Burning Wound,” save defensive cooldowns for times when your healer is moving from multiple mechanics at once, and keep the “Lava Scions” near “Son of Flames” to allow them to be AoE’d down together. Lastly, be cautious of the “Entrapping Roots” position in the fourth phase; you’ll need to keep Ragnaros near them, but do not activate them.
Ragnaros Abilities
Phase One
- Sulfuras Smash
- Lava Wave
- Wrath of Ragnaros
- Hand of Ragnaros
Magma Trap
- Magma Trap Eruption
- Magma Blast
- Burning Wound
Intermission One
- Splitting Blow
- Lave Bolt
Son of Flame
- Burning Speed
- Supernova
Phase Two
- Sulfaras Smash
- Lava Wave
- Magma Blast
- Burning Wound
- engulfing Flames
- Molten Seed
- Molten Inferno
- Molten Elemental
Intermission Two
- Splitting Bow
- Lava Bolt
Son of Flame
- Burning Speed
- Supernova
Lava Scion
- Blazing Heat
Phase Three
- Sulfaras Smash
- Lava Wave
- Magma Blast
- Burning Wound
- Engulfing Flames
Living Meteor
- Meteor Impact
- Combustible
Phase Four (Heroic Only)
- Magma Trap Vulnerability
- World in Flames
Molten Elemental
- Molten Power
- Empower Sulfaras
- Magma Geyser
- Dreadflame
- Superheated
Cenarius
- Breadth of Frost
Malfurion Stormage
- Cloudburst
- Deluge
Arch Druid Hamuul Runetotem
- Entrapping Roots

Firelands Raid - WoW Loot
One of the most exciting things for players taking on the Firelands WoW raid is the rewards. Which is why we’ve broken down each of the boss's loot drops and shared drops; let’s get into it:
Shared Fireland Raid in WoW Drops
In both normal and heroic difficulty, you’ll have the chance to obtain the following:
- Avool’s Incendiary Shanker
- Entrail Disgorger
- Eye of Purification
- Shatterskull Bonecrusher
- Firethorn Mindslicer
- Skullstealer Greataxe
- Zoid’s Firelit Greatsword
- Smoldering Censer of Purity
- Living Ember
Shannox Loot Drops
There are differing rewards for the normal and heroic difficulty of this Firelands raid in WoW; we’ll list them below for you to check out:
- Coalwalker Sandals (normal/heroic)
- Flickering Shoulderpads (normal/heroic)
- Gloves of Dissolving Smoke (normal/heroic)
- Scalp of the Bandit Prince (normal/heroic)
- Treads of Impact Obedience (normal//heroic)
- Bracers of the Dread Hunter (normal/heroic)
- Legplates of Absolute Control (normal/heroic)
- Legplates of Frenzied Devotion (normal/heroic)
- Uncrushable Belt of Fury (normal/heroic)
- Necklace of Fetishes (normal/heroic)
- Crystal Prison Band (normal/heroic)
- Feeding Frenzy (normal/heroic)
- Leggings of the Fiery Conqueror (heroic)
- Leggings of the Fiery Protector (heroic)
- Leggings of the Fiery Vanquisher (heroic)
- Crystallized Firestone (heroic)
Lord Rhyolith Loot Drops
All drops from this Firelands raid WoW encounter are both from normal and heroic difficulty experiences, excluding the final reward.
- Flickering Cowl
- Hood of the Rampant Disdain
- Incentive Chestguard
- Flaming Core Chestguard
- Lava Line Wristbands
- Cracked Obsidian Stompers
- Earthcrack Bracers
- Fireskin Gauntlets
- Grips of the Raging Giant
- Dreadfire Drape
- Hearthstone of Rhyolith
- Volcanospike
- Arbalest of Erupting Fury
- Crystalized Firestone

Beth’tilac Loot Drops
Similarly to the above Firelands WoW raid encounter, all items are received from both normal and heroic difficulty, excluding the final item.
- Robes of Smoldering Devastation
- Cindersilk Gloves
- Cinderweb Leggings
- Cowl of the Clicking Menace
- Flickering Shoulders
- Thoracic Flame Kilt
- Arachnaflame Treads
- Carapace of Imbibed Flame
- Spaulders of Manifold Eyes
- Widow’s Kiss
- Spidersilk Spindle
- Mandible of Beth’tilac
- Funeral Pyre
- Ward of the Red Widow
- Crystalized Firestone
Alysrazor Loot Drops
Unlike its predecessors, this Firelands raid in WoW encounter, there are some differences between the normal and heroic loot drops; take a look:
- Leggings of Billowing Fire
- Flickering Wristbands
- Phoenix-Down Treads
- Clawshaper Gauntlets
- Craterflame Spaulders
- Moltenfeather Leggings
- Clutch of Firemother
- Greathelm of the Voracious Maw
- Lavaworm Legplates
- Spaulders of Recurring Flame
- Wings of Flame
- Alysrazor’s Band
- Eye of Blazing Power
- Alysra’s Razor
- Chest of the Fiery Conqueror (heroic only)
- Chest of the Fiery Protector (heroic only)
- Chest of the Fiery Vanquisher (heroic only)
- Crystalized Firestone (heroic only)
Baleroc Loot Drops
This is another Fireland WoW raid encounter that has some heroic difficulty specific drops; check it out:
- Mantle of Closed Doors
- Breastplate of the Incendiary Soul
- Glowing Wing Bracers
- Shoulderpads of the Forgotten Gate
- Decimation Treads
- Gatekeeper’s Embrace
- Casque of Flame
- Flickering Handguards
- Helm of Blazing Glory
- Necromantic Focus
- Gatecrasher
- Molten Scream
- Shard of Torment
- Gauntlets of the Fiery Conqueror (heroic only)
- Gauntlets of the Fiery Protector (heroic only)
- Gauntlets of the Fiery Vanquisher (heroic only)
- Crystalized Firestone (heroic only)

Majordomo Staghelm Loot Drops
Unlike others in this segment of our WoW Firelands raid guide, there are some difficulty specific items with these encounter drops; take a look at how they’re categorized below:
- Wristwraps of Arrogant Doom (both)
- Firecat Leggings (both)
- Sandals of Leaping Coals (both)
- Grips of Unerring Precision (both)
- Bracers of the Fiery Path (both)
- Breastplate of Shifting Visions (both)
- Treads of the Penitent Man (both)
- Flowforn Choker (both)
- Jaws of Defeat (both)
- The Hungerer (both)
- Fandral’s Flamescythe (both)
- Stinger of the Flaming Scorpion (both)
- Mantle of the Fiery Conqueror (normal)
- Mantle of the Fiery Protector (normal)
- Mantle of the Fiery Vanquisher (normal)
- Shoulder of the Fiery Conqueror (heroic)
- Shoulder of the Fiery Protector (heroic)
- Shoulder of the Fiery Vanquisher (heroic)
- Crystalized Firestone (heroic)
Ragnaros Loot Drops
For the long-awaited final boss drops of the Firelands raid in WoW, you can expect a chance to receive the following items, some of which again vary on difficulty:
- Fingers of Incineration (both)
- Majordomo’s Chain of Office (both)
- Crown of Flame (both)
- Pauldrons of Roaring Flame (both)
- Choker of the Vanquished Lord (both)
- Matrix Restabilizer (both)
- Variable Pulse Lightning Capacitor (both)
- Vessel of Acceleration (both)
- Ko’gun, Hammer of the Firelord (both)
- Sulfuras, the Extinguished Hand (both)
- Sho’ravon, Greatstaff of Annihilation (both)
- Helm of the Fiery Conqueror (normal)
- Helm of the Fiery Protector (normal)
- Helm of the Fiery Vanquisher (normal)
- Smouldering Egg of Millagazor (both)
- Crown of the Fiery Conqueror (heroic)
- Crown of the Fiery Protector (heroic)
- Crown of the Fiery Vanquisher (heroic)
- Crystalized Firestone (heroic)
Now that we’ve covered all of the potential loot drops in the Firelands Wow raid let’s take a look at the possible achievements you can complete when taking on these seven challenging encounters:
Firelands Raid in WoW - Achievements
By putting your skills to the test with this exciting team challenge, you can achieve the following:
- Death from Above - kill Cinderweb Drones only when they are on top of the canopy while battling Beth’tilac in the Firelands raid in WoW.
- Not an Ambi-Turner - defeat Lord Rhyolith without having him turn left at all while his armor is intact.
- Do a Barrel Roll! - defeat Alysrazor without any raid members being hit by these moves: Bushfire, Incendiary Cloud, Lava Spew and Fiery Tornado.
- Bucket List - take Shannox to Beth’tilac’s Lair, Path of Corruption, Shatterstone, Flamebreach, and The Ridge of Ancient Flame in one bout before dispatching him.
- Share the Pain - slay Baleroc without any of your team suffering from Torment more than three times.
- Only the Penitent - activate both the Fandral’s Flames at the same time without a raid member being hit by Kneel to the Flame.
- Ragnar-O’s - take down Ragnaros while there are three Living Meteors ignited by Lava Wave.
- Firelands - take down all bosses in the Firelands.
- Firelands Guild Run - slay all bosses in the Firelands in a guild group.
- Heroic: Shannox - defeat Shannox on heroic difficulty.
- Heroic: Lord Rhyolith - defeat Lord Rhyolith on heroic difficulty.
- Heroic: Beth’tilac - slay Beth’tilac on heroic difficulty.
- Heroic: Alysrazor - take down Alysrazor on heroic difficulty.
- Heroic: Baleroc - defeat Baleroc on heroic difficulty.
- Heroic: Majordomo Fandral Staghelm - defeat Majordomo on heroic difficulty.
- Heroic: Ragnaros - defeat Ragnaros on heroic difficulty.
- Realm Curt! Ragnaros - be the first guild in the realm to defeat Ragnaros in heroic difficulty in a guild group.
- Heroic: Ragnaros Guild Run - defeat Ragnaros in a guild group on heroic difficulty.
- Glory of the Firelands Raider - battle all bosses in heroic difficulty and complete all other achievements.
Firelands Raid WoW - FAQ
As with all of our guides, it’s time to take a look at some of those frequently asked questions that play on our reader's minds and put any of your doubts to rest:
Is the WoW Firelands Raid Difficult?
This isn’t one of the hardest raids out there, but that’s not to say it’s a walk in the park, either. In normal difficulty, players must have at least level 35 to participate, but we, of course, always recommend higher levels to give that added edge. Additionally, you must factor in your group size, as even in heroic difficulty, a group of 25 players is going to have an easier time than 10. Given the complexity of some areas of these raids, we advise you to scope out the area, mechanics and phases of these raids to give yourself the best chance of success.
Which expansion is the Firelands Raid in WoW part of?
This raid experience is part of the third phase in WoW Cataclysm Classic, so if you want to enjoy the adrenaline-inducing adventure, make sure you have access to all of the necessary content.
The End of the Seven Sieges in the Firelands Raid WoW
After you have traversed the Firelands, taking down challenge after challenge, you’re owed a well-deserved rest and some time to wrap your head around the new loot drops, achievements and more. Once you’re ready to get back into action, take a deep dive into our blog section and find your next enthralling adventure! Additionally, you can find some outstanding WoWC items, an abundance of currency, and expertly built accounts to ensure your adventures are nothing less than exceptional. Take some time to browse today and line up your next Chicks Gold purchase! We’ll be back next week with some more interesting and challenging adventures; we hope to see you there!